Overview
Using JSF Tags
Overview
In this lab you will start developing a JSF-enabled Web application. The Web application will simulate a shopping Web site, where users add items to a shopping cart and then proceed to a check-out page. In this lab, you will define the main shopping page as follows (details follow):

Roadmap
There are five exercises in this lab:
- Create a JSF-enabled Web application.
- Add a cascading style sheet (CSS) to the Web application.
- Display the "product list" section of the page.
- Display the "manage my cart" section of the page.
- Display the "contents of cart" section of the page.
Step 1: Create a JSF-enabled Web application
In Eclipse, create a new dynamic JSF web project as before – adding the necessary .jar files and updating web.xml. Make sure you select the option to generate a web.xml deployment descriptor file.
Add a file called shop.xhtml in the WebContent folder, add a simple Hello World message in the body.
Now run the web project, and verify your page appears correctly.
Step 2: Add a cascading style sheet (CSS) to the Web application
Add a new CSS file in the CSS folder in WebContent folder
<h:head>
<title>Shopping Cart</title>
<h:outputStylesheet name="stylesheet.css" library="css"/>
</h:head>
<h:body>
body {
    font-family: Arial,Helvetica,sans-serif;
    font-size: 12px;
    background-color: lightblue;
    color: darkblue;
}
Place the stylesheet in a folder callled css which is inside a folder called resources in the WebContent.
▾ 📁 webcontent
  ▾ 📂 images
  ▾ 📂 META-INF
  ▾ 📂 resources
    > 📂 css
  ▾ 📂 WEB-INF
Run the web application again. Verify the page appears in the browser with a light blue body background and a dark blue font. This confirms that the style sheet has been applied successfully.
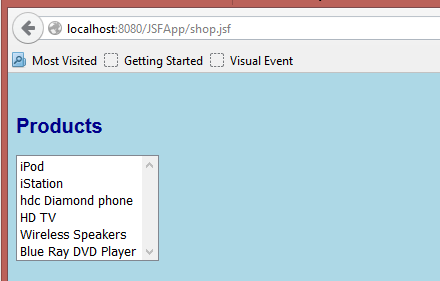
Step 3: Display the "product list" section of the JSP page
You will now start adding JSF tags to define the UI for the Web page…
Add <h:form> element. This is important – if you want to define input controls (such as text boxes and buttons) that submit data to the server, you must enclose them inside an <h:form> element.
Inside the <h:form> element, add appropriate JSF tags to display the "product list" section of the Web page, as follows:
Hints:
-
For the Products heading, use a h2 with class set to "heading".
- For the list box, use an.heading { display: block; font-size: 20px; margin-top: 40px; }<h:selectOneListbox>. Set its id to productsListBox. - For each item in the list box, use an<f:selectItem>. Set the itemLabel to the displayable text (such as iPod), and set the itemValue to an integer number (0 for the first item, 1 for the next item, 2 for the next item, etc.).
Run the Web application to make sure the page looks fine before you move on.
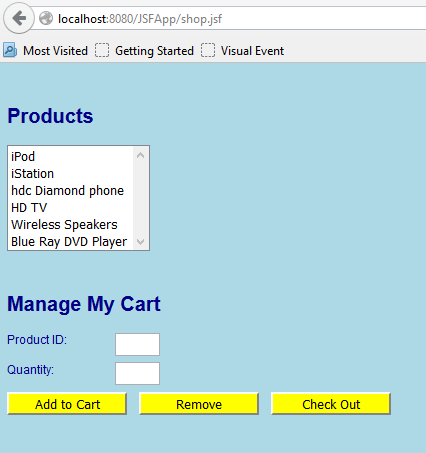
Step 4: Display the "manage my cart" section of the JSP page
In shop.xhtml, add more JSF tags to display the "manage my cart" section of the Web page, as follows:
Hints:
-
For the Manage my cart heading, use a
<h2>with class equal to "heading"- For each label, use an
<h:outputLabel>. - For each text box, use an
<h:inputText>. Give the text boxes meaningful id attributes, such as productID and quantity. Set the Product ID text box to be read-only (readonly=”true”)- users will not be allowed to type a product ID manually – instead, they will select an item in the products list box, and it will automatically set the Product ID text box to the selected product ID; this will be in a later exercise). - Apply CSS to the
<label>and<input>to get correct alignmentlabel { width: 8em; padding-right: 1em; float: left; } input { margin-bottom: .5em; } - For each button, use an
<h:commandButton>. Set the id attributes to add, remove, and checkout. Set the styleClass attribute for each button to ActionButton.
.ActionButton {
    width: 120px;
    background-color: yellow;
}
Test the Web application before you continue.
- For each label, use an
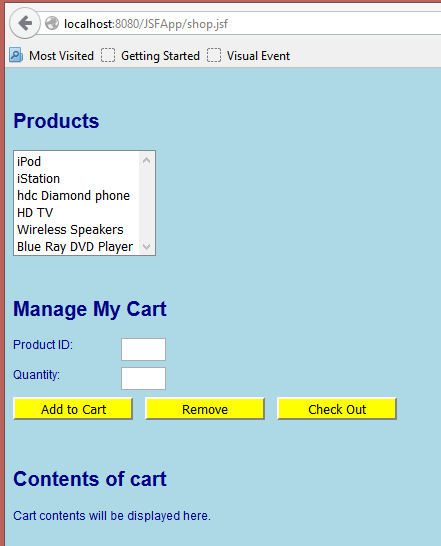
Step 5: Display the "contents of cart" section of the JSP page
Add more JSF tags to display the "contents of cart" section of the Web page, as follows:
Hints:
- For the Contents of cart heading, use
<h2>. Set its class to "heading". - Display a placeholder message, such as Cart contents will be displayed here, for now.
Test the Web application.